

Blog
Guide to Wall Panel Accessories That Finish Well

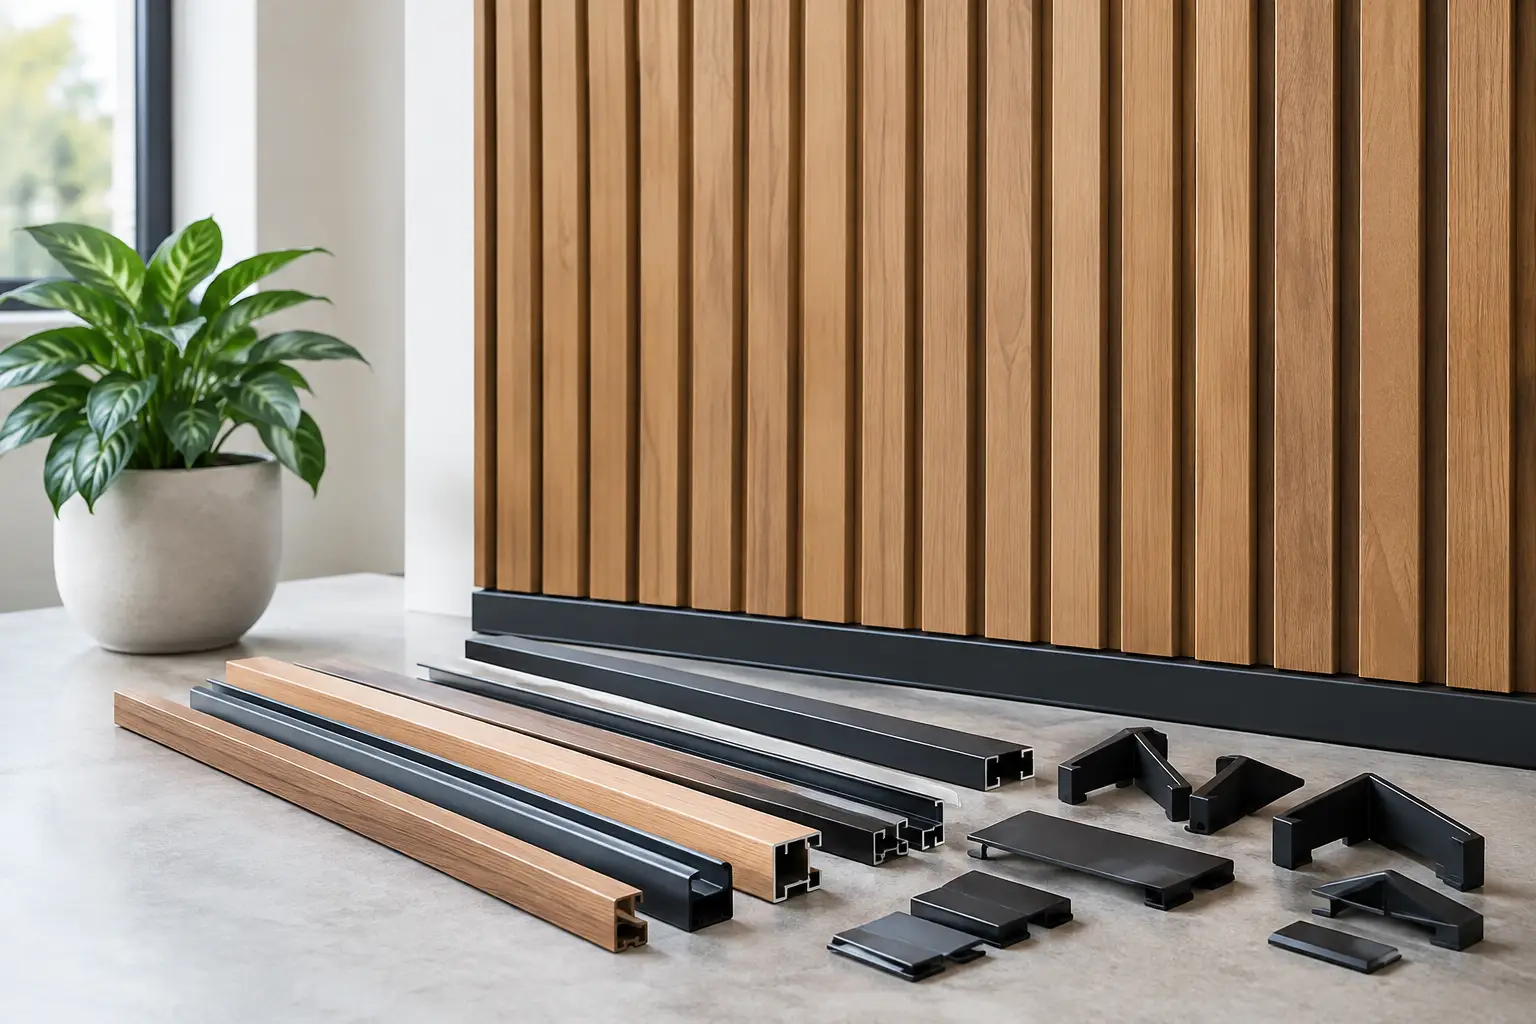
A beautifully finished wall is rarely only about the panel itself. In a refined living room, hospitality reception, boardroom, or covered patio, the details at every edge determine whether the result feels considered or incomplete. This guide to wall panel accessories explains the finishing components that bring acoustic slat and composite wall panel installations together with confidence.
Accessories are not simply decorative additions. They protect vulnerable panel edges, create clean transitions, accommodate changes in direction, and give an installation the tailored appearance expected of a premium surface. The right selection depends on where the panels are installed, how the wall meets adjoining materials, and whether the finish needs to perform indoors or in exposed outdoor conditions.
Why Wall Panel Accessories Matter
Wall panels create the visual foundation, but trims and finishing pieces provide the architectural punctuation. A neat corner edge can make a compact hallway feel intentionally designed. An end slat can turn an exposed panel run into a feature rather than an unfinished stopping point. At ceiling level, a considered transition helps the surface feel integrated with the room instead of applied afterward.
There is a practical side too. Edges are the areas most likely to be bumped, touched, or exposed to moisture and dust. Well-matched accessories help protect these points while simplifying installation around reveals, alcoves, doors, windows, and changes in wall depth.
For commercial spaces, these details carry even more weight. Designers and contractors often specify decorative surfaces across long reception walls, meeting rooms, restaurant seating areas, and retail displays. Consistent accessories allow those larger installations to maintain a crisp, uninterrupted rhythm from one panel section to the next.
The Essential Accessories for Wall Panels
Trims for clean starts, stops, and transitions
Trims are designed to finish the perimeter of a panel installation. Depending on the profile, they can frame an exposed edge, cover a cut line, or create a controlled transition between the panel and an adjacent wall, ceiling, floor, or surface finish.
Choose a trim when the panel run begins or ends in open view, such as beside a doorway or at the edge of a media wall. They are equally useful where panels meet paint, stone, tile, or cabinetry. A color-coordinated trim produces a more unified look, while a contrasting finish can be used deliberately to define the panel zone.
The trade-off is visual. A visible trim creates a clear border, which suits structured and contemporary interiors. If the goal is a softer, more continuous transition, a recessed detail or carefully positioned end slat may be the better choice. Plan this before ordering, as the preferred finish can affect panel measurements and the layout of the first and last boards.
Corner edges for polished external corners
External corners are prominent, especially on feature walls that wrap around chimney breasts, room dividers, columns, or reception desks. A corner edge covers and protects the point where two panel faces meet, delivering a sharp line without relying on a difficult exposed cut.
For acoustic slat wood panels, this accessory keeps the slat pattern looking disciplined when the design turns a corner. For exterior composite paneling, it helps create a finished edge that stands up to the visual and practical demands of patios, boundary walls, entertainment areas, and facade features.
Match the corner edge to the panel color when you want the surface to read as one continuous material. Consider a contrasting edge only when it supports the broader scheme, perhaps echoing black window frames, bronze lighting, or dark metal furniture. The goal is intentional contrast, not an accidental mismatch.
End slats for exposed panel runs
An end slat is one of the most valuable finishing elements in an acoustic wall panel installation. It completes the open side of a slatted panel run so the final edge reflects the same depth, spacing, and visual quality as the rest of the wall.
This is particularly effective on TV feature walls, bedhead walls, passageways, and ceiling installations where the panel does not terminate against another surface. Without a dedicated finishing piece, the final cut can expose backing material or disrupt the rhythm of the slats.
End slats also offer flexibility during planning. When a wall dimension does not divide neatly into full panels, positioning the cut side toward a less visible edge and using an end slat on the exposed side can preserve a more balanced composition. It is a small decision that can noticeably improve the finished result.
V-groove solutions for a more tailored surface
V-groove solutions create deliberate shadow lines between panel sections or across broad decorative surfaces. They are especially useful where a designer wants the warmth of wood-inspired texture with a more linear, architectural expression than a traditional slat profile.
Use V-groove details to introduce proportion on a large wall, align the surface with cabinetry or ceiling lines, or make an expansive installation feel more custom. In commercial interiors, the grooves can bring calm structure to areas that need a premium finish without excessive visual movement.
Spacing matters. Narrow, closely repeated grooves can appear more detailed and formal, while wider spacing feels quieter and more contemporary. Before installation, map the panel layout across the full elevation rather than making decisions panel by panel. This avoids narrow, awkward sections at the ends of the wall.
Choosing Accessories for Indoor and Outdoor Panels
Interior and exterior applications call for different priorities. Indoors, the focus may be acoustic comfort, visual warmth, and a clean finish around furniture, lighting, and joinery. Acoustic slat panels can help soften echo and improve speech clarity in rooms with hard surfaces, making them a strong choice for home offices, entertainment spaces, restaurants, and meeting rooms.
For these installations, accessories should be selected around the room’s sightlines. Stand at the entrance, seating area, and main work position to see which panel edges will be visible. Those are the edges that deserve the most attention.
Outdoors, weather resistance and drainage become more significant. Composite wood panels are designed to offer the appeal of natural timber without the regular sealing, staining, and upkeep that timber can demand. Yet even a low-maintenance surface needs correct detailing. Use exterior-suitable trims and corner components, allow for recommended expansion and ventilation requirements, and avoid trapping water behind the cladding.
A fully exposed boundary wall faces different conditions from a covered entertainment area. Sun, wind-driven rain, coastal air, and temperature changes can influence the best installation approach. When in doubt, plan the accessory system around the most exposed part of the project, not the most sheltered one.
Plan Accessories Before You Order Panels
The easiest way to avoid costly adjustments is to treat accessories as part of the panel system from the first measurement. Measure the width and height of each wall, then identify every open edge, external corner, internal return, door reveal, window reveal, and junction with another finish.
A simple elevation sketch is useful for homeowners and essential for larger professional projects. Mark the direction of the panel lines, the panel start point, and where cuts will fall. This helps reveal whether the installation needs trims, corner edges, end slats, or V-groove components before work begins.
Also account for the substrate. Panels need a sound, level mounting surface and the appropriate fixing method for the wall construction. Uneven masonry, moisture-affected walls, or poorly prepared battens can compromise an otherwise beautiful finish. Accessories can conceal certain edges, but they should not be used to hide fundamental installation problems.
For a project with integrated lighting, cabinetry, electrical outlets, or wall-mounted screens, coordinate these elements early. A panel layout that looks perfect on paper may need adjustment once outlet positions, cable routes, and mounting brackets are considered.
Color, Grain, and Direction Make the Difference
Premium wall finishes are defined by consistency. When selecting accessories, consider not only the base color but also grain direction, texture, and sheen. A close match will create a calm, continuous plane. A different tone can define architectural lines, but it should relate clearly to another material in the room.
Panel orientation changes the mood as well. Vertical slats can make ceilings feel higher and bring a composed, elegant rhythm to a room. Horizontal lines can emphasize width and work well on long feature walls. On exterior facades, the direction should complement the architecture while supporting sensible water management and fixing requirements.
Order enough finishing components to complete the installation in one consistent batch where possible. This is particularly helpful for larger projects, where small variations in finish can become more noticeable across multiple walls.
A Finish Worth Looking Closely At
Wall panel accessories are where a surface moves from attractive to complete. They protect the investment, resolve difficult edges, and give the whole installation the composure of a professionally considered interior or exterior.
Whether you are shaping a quieter home office, a striking hospitality backdrop, or an outdoor entertaining space with lasting warmth, start with the final edge in mind. The panels create the statement, but the finishing details are what allow that statement to hold its quality from every angle.